
You will need to place two small Javascript Tracking Codes and create a triggered campaign to begin re-targeting those abandoned carts.
In this document, we are going to show you how to track abandoned shopping carts as custom events, which can then be used to trigger automated notifications to recover them.
These steps are for non-Shopify websites. If you are using Shopify, then Abandoned Carts are automatically tracked for you as an event and you do not need to follow these steps below. Simply head to your dashboard and activate abandoned cart notifications under "Notifications" > "Triggered Notifications". We also automatically track custom variables for you which you can learn about at the bottom of this article.
Note: While older "_aimtellAbandonedCart" functions will still function, these are being deprecated in favor of the below. At your earlier convenience, please update your site to ensure they are using these new versions.
Step 1: Abandoned Cart Listener Snippet
The first step is to add the following snippet on your "Cart" or "Checkout" page. Place this just below your closing "</body>" tag.
<script>
_at.track("cart", {"type" : "add-to-cart", "delay" : 30 });
</script>
In this example, a cart is deemed abandoned if the user does not complete it in 30 minutes. You can change that to any number you want (60 = 60 minutes, 120 = 2 hours, etc)
Step 2: Cart Completion Listener
Next, place the following code on your "order complete" or "thank you" page.
<script>
_at.track("cart", {"type" : "order-complete" });
</script>
Step 3: Create Triggered Campaign
After you add the two code snippets to your site you will start seeing "Abandoned Cart" events showing up in your event logs. These events are what you will use to create your triggered campaign that will automatically send to any subscriber who fulfills the trigger (in the above example, that would mean they abandoned their cart for 30 minutes).
It's usually easiest to let the code run for 24 hours so that you can easily see the events being logged in your dashboard (Logs > Event Logs). Once you are ready you may start creating your triggered campaign. For more help with that setup process, read our triggered push campaign documentation.
Be sure to also take advantage of our templates section which includes an Abandoned Cart template that has the correct trigger set up and also has conversion tracking enabled:

Find this template by going to Triggered Notifications > Templates > View Template. Select ‘Use Template’ to add it to your list of triggered notifications. Keep in mind that the notification will only work if you have already properly set up to track your abandoned carts. This also applies to the conversion tracking, which you can learn about in our conversion tracking documentation.
Abandoned Carts aren’t the only thing you can track, you can also set up Abandoned Funnel notifications for subscribers who abandon other pages at your site, such as a form submission page. Learn how to set this up in our abandoned funnel documentation.
Additional Notes
Extending Abandoned Carts
By default, only one abandoned cart will be tracked per subscriber per day. This is done to prevent the potential notification loop that could occur if the user clicked an abandoned cart notification and then did not purchase an item, effectively restarting the abandoned cart logic.
If you'd like to listen for an abandoned cart more than once per day (say, for instance the user updates their cart after clicking the original abandoned cart notification) you can call the following javascript function which will reset the abandoned cart listener:
<script>
_at.track("cart", {"type" : "cart-updated" });
</script>
Using Custom Variables
Much like how our Custom Events support passing variables for additional personalization in notifications, so do abandoned cart snippets. This allows you to dynamically pull content from your cart page and display it in your push notifications.
Here is an example snippet of code that could be added on a cart page:
<script>
_at.track("cart", {
   "type" : "add-to-cart",
   "delay" : 30,
   "variables" :{
       "price": 15,
       "lens" : "polorized",
       "product_page": "https://example.com/collections/premiums-sunglasses/products/black-moonshine-premiums",
       "icon" : "https://cdn.shopify.com/s/files/1/1356/7869/products/affordable-sunglasses-black-moonshine-premiums-flyover_1024x1024.png?v=1562372323"
    }
});
</script>
The first part of the snippet is the same as the standard abandoned cart listener snippet. What has been added are variables like price, icon, and product page. This allows you to create a much more detailed push notification. Here is an example set up of a triggered campaign that pulls in these custom variables:
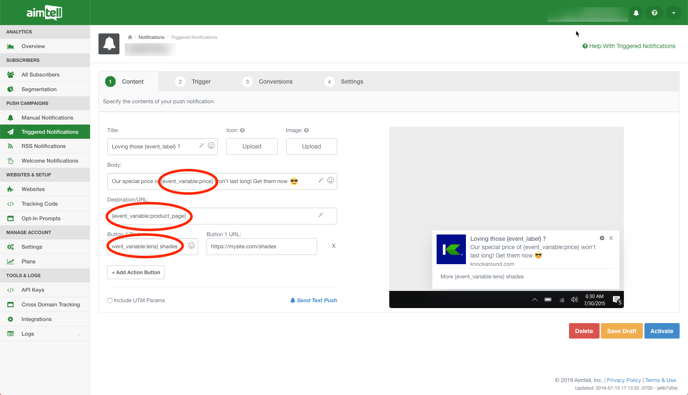
Whatever is in the parameter brackets { } with be replaced with the appropriate information. You can also provide fallback text that will display if the info in the brackets is not provided. For example, {event_label:Moonshine Premiums | shades}. Fallback text is optional.
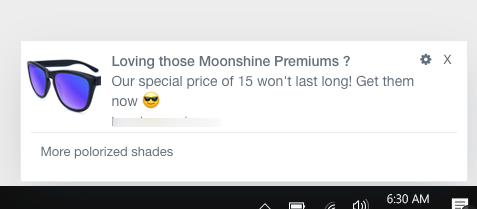
And here is what the final push notification would look like:
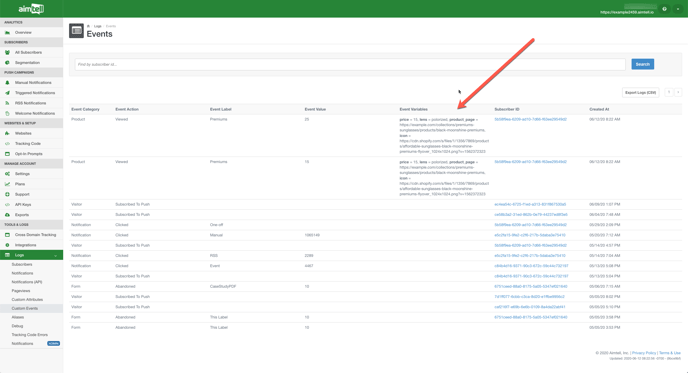
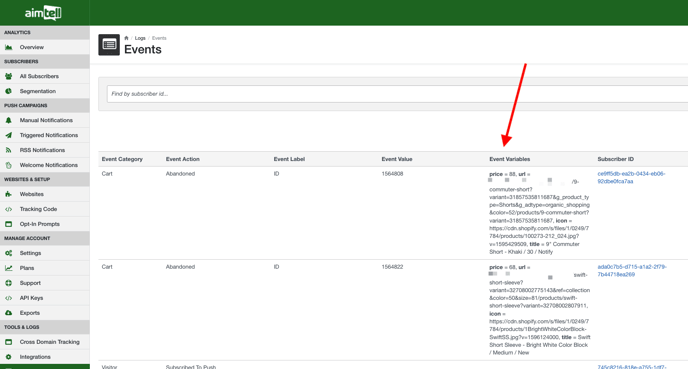
To make sure things have been set up properly we recommend checking your Event Log once you have added your code. From your dashboard head to Logs > Custom Events and see if everything looks correct. There is an Event Variables column that should display what you input if you did so correctly.
Tip: Using the "icon" or "image" custom variable will replace the icon and image automatically, as seen in the above example.
Custom Variables for Shopify
The custom variables of price, URL, icon, and title are all automatically tracked for Shopify users. Head to Logs > Custom Events to see these variables in the Event Variables column.
You can use these variables in your campaigns. Simply type a curly bracket { to pull up your list of available variables wherever you’d like to use them in your campaign. They can be used in your title, body content, icon, URL, and action buttons. You can also provide fallback text that will display if the info in the brackets is not provided. The icon custom variable will replace the icon in your campaign automatically.
If there are multiple items in the cart, we will only track the variables for the first item in the cart.
Note: For Shopify users, we automatically track the following event variables: Price, Icon, URL, and Name of the Product!